Irresistible Keto Salami Roll-Ups for Easy Snacking
Irresistible Keto Salami Roll-Ups for Easy Snacking
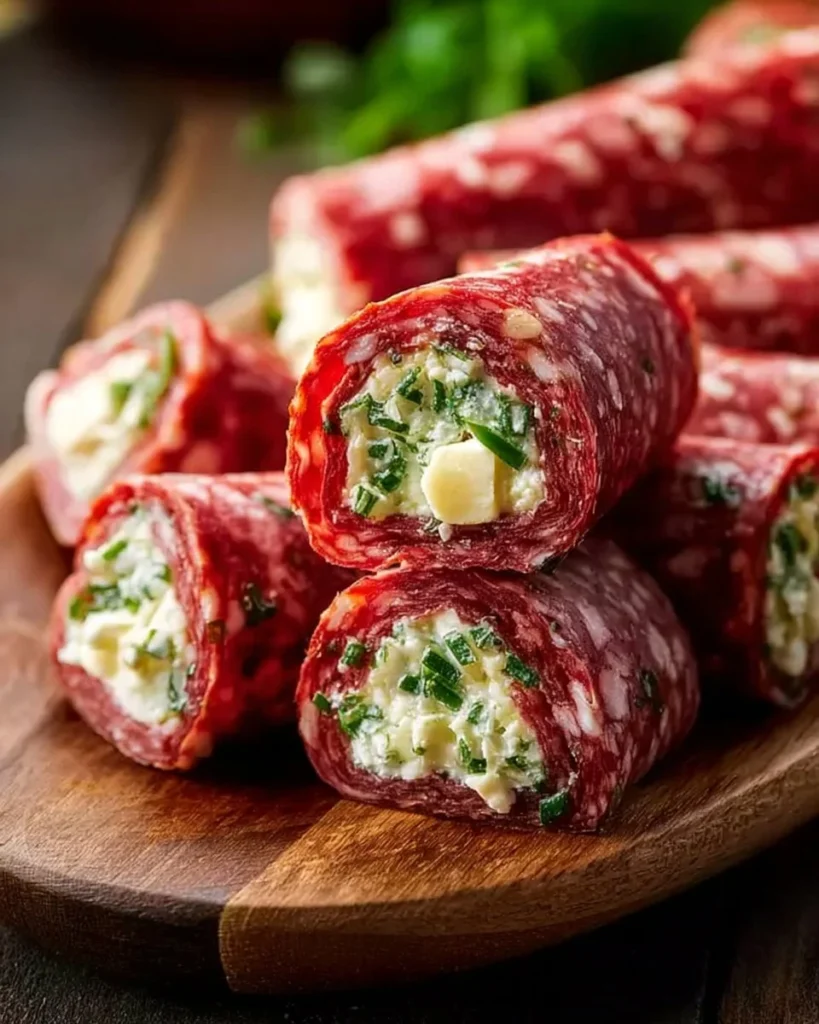
Irresistible Keto Salami Roll-Ups for Easy Snacking are a fast, tasty snack that many people love. This dish brings old deli flavors into a small, simple bite. Salami has a deep, meaty smell that wakes your nose. Creamy filling adds soft, cool feel. Together they make a mix of salt, fat, and small spice that makes you want more. The roll is thin and tight. When you bite, the salami gives a little chew and the filling melts in your mouth. The edges can be a bit crisp if you toast them, and the center stays smooth. This kind of roll-up dates back to deli plates and party trays. People made meat and cheese rolls for snacks at family tables. Home cooks later added things like herbs, pickles, and mustard to make many versions. Our keto take keeps carbs low and flavor high. It is perfect for people who want a quick bite that fits a low-carb plan. This recipe is simple enough for beginners and fast enough for busy days. Make a tray for guests or a quick snack for work. You can change the filling to suit your taste or what is in your fridge. If you want other simple, comfort dishes to pair with these roll-ups, try my easy chicken pot pie casserole recipe. You will love how fast they come together. They also travel well for packed lunch or picnic. Read on for a clear, step-by-step recipe and tips to store and serve them fresh anytime.
Why make this recipe
- Low carb and keto friendly: Each roll-up keeps net carbs very low, so you can snack without breaking a low-carb plan.
- Fast to make: You can make a tray in 10–15 minutes. No oven or long cook time needed for the basic version.
- Beginner friendly: The steps are simple: mix, spread, roll. No hard chef skills required.
- Cost effective and pantry-staple friendly: You can use common deli salami and basic fridge items like cream cheese and pickles.
- Crowd-pleaser: These bite-size rolls work for parties, lunches, and quick snacks. Most people like the rich, salty taste.
- Versatile: You can change fillings and add herbs, hot sauce, or crunchy pickles to suit taste.
- Better than other versions: This recipe focuses on tight rolling and chilled setting so rolls slice cleanly and hold shape. We add a small acid element (mustard or vinegar pickle) to balance fat and enhance flavor, which many roll-up recipes miss.
How to make Irresistible Keto Salami Roll-Ups for Easy Snacking
This recipe relies on a few simple goals: make a smooth, spreadable filling; place it thin so rolls don’t bulk up; roll tightly so they hold shape; chill to set the filling; and toast if you want a crisp edge. The "science" is basic. Fat in the cream cheese acts as a binder and gives a rich mouthfeel. Adding a bit of shredded cheese helps structure when chilled so slices hold. Acidic bits (mustard, lemon, or chopped pickle) cut the heavy fat and brighten the flavor. Salt from salami pairs with creamy filling to create balance. Rolling tightly forces layers to cling and compress, which gives a neat appearance and a good bite. Chilling firms the fat and cheese so the roll keeps its form when you slice. If you toast or air fry the roll, the outside salami may crisp; the heat melts the filling top layer slightly and gives a nice contrast of texture. Follow the steps with care: mix until smooth, spread thin, roll tight, chill, and slice with a sharp knife.
Ingredients
- 12–16 thin slices of deli salami (about 6–8 inches long)
- 8 oz (225 g) full-fat cream cheese, softened
- 1/2 cup shredded mozzarella or cheddar cheese
- 2 tablespoons finely chopped dill pickle or pepperoncini
- 1 tablespoon Dijon mustard
- 2 tablespoons chopped fresh chives or green onion
- 1/4 teaspoon black pepper
- Optional: 1/4 teaspoon smoked paprika or red pepper flakes for heat
- Optional garnish: fresh parsley, olive slices, or sesame seeds
Choose good quality items: pick thin but firm salami slices with visible fat marbling; this gives flavor and helps crisp edges if you toast. Use full-fat cream cheese for the best texture and taste; lower-fat cheese can make the filling watery. Fresh herbs add bright flavor—avoid wilted greens. For a low-sodium option, choose reduced-sodium salami and add more herbs to boost flavor. If you need swaps: use sliced turkey or prosciutto for a milder meat; use dairy-free cream cheese for a vegan option with garlic herb cheese bread served on the side; or replace pickles with thin cucumber for a lighter crunch.
Directions
-
Prep the filling. In a bowl, beat softened cream cheese until smooth. Add shredded cheese, chopped pickle, Dijon, chives, and pepper. Mix with a spoon until even. The filling should look glossy and feel soft but not runny. Smell: mild tang from mustard and pickle. Goal: a spreadable paste that holds its form.
-
Lay out salami. Place one slice on a clean board or plate. Look for smooth, flat parts—avoid folds. If slices are too small, overlap two slightly to make a longer sheet. Visual cue: the salami should make a thin, even base.
-
Spread filling. Use a small spatula or butter knife to spread about 1–2 tablespoons of filling in a thin line along one end of the salami, leaving a 1/4 inch border at the far edge. The spread should be even and not piled. You should still see the meat around the filling.
-
Add extras. Place a thin strip of pickle, pepper, or a sliver of roasted pepper over the filling if you like extra crunch. This adds texture and a clean, acidic bite against the fatty cheese.
-
Roll tightly. Starting from the filled end, lift and roll the salami away from you, keeping pressure to make a compact cylinder. Seal the end against the roll. Visual cue: you should see a neat spiral edge and no loose ends. Sound cue: a soft, quiet squeeze; no slipping.
-
Chill to set. Place rolls seam-side down on a tray and chill 20–30 minutes. The filling will firm and bonds will form. The roll should feel firm to the touch, not floppy.
-
Slice and finish. Use a very sharp knife, wipe blade between cuts, and slice into 1-inch rounds. Look for clean edges and visible filling spiral. Optional: for crisp edges, place sliced rolls under a broiler 1–2 minutes or air fry at 375°F (190°C) for 3–4 minutes. Visual cue: salami edges will darken and slightly curl; fill will warm but not melt away.
-
Serve soon after slicing for best texture and flavor.
How to serve Irresistible Keto Salami Roll-Ups for Easy Snacking
- Party tray style: Arrange roll-ups on a white plate in concentric circles. Add small bowls of mustard, olive tapenade, and pickles in the center for color and choices.
- Picnic pack: Pack in a container with crisp celery sticks, cheddar cubes, and a small jar of mustard. They travel well and stay fresh cold.
- Appetizer platter: Place roll-ups beside sliced cheeses, nuts, and olives. Add fresh herbs and thin lemon wedges for brightness.
- Drink pairings: Pair with a dry white wine like Sauvignon Blanc, a light lager, or a sparkling water with lemon. For non-drinkers, a cold herbal iced tea balances the salt and fat.
To make the plate look pro: use a small garnish of microgreens on top of a few rolls, keep sauce bowls neat, and use odd numbers (3 or 5) per plate for a pleasing look.
How to store Irresistible Keto Salami Roll-Ups for Easy Snacking
Fridge short-term: Place unsliced or sliced roll-ups in an airtight container with parchment paper between layers. Keep them cold in the fridge for up to 3–4 days. Chilled rolls hold shape best and taste fresh.
Freezer long-term: Wrap each roll individually in plastic wrap, then place in a freezer bag with the air pushed out. Freeze up to 1 month for best quality. Thaw in the fridge overnight before slicing or reheating.
Reheat without drying: If you toasted the rolls, reheat briefly in a 325°F (160°C) oven for 5–7 minutes or in an air fryer at 350°F (175°C) for 3–4 minutes. To keep the filling moist, cover loosely with foil for oven reheating, or place a damp paper towel under rolls in the microwave for 10–15 seconds on low power. Avoid long microwave heating that makes the meat chewy or the filling oily.
Tips to make Irresistible Keto Salami Roll-Ups for Easy Snacking
- Use thin salami slices: Thin slices roll better and crisp more evenly if you toast.
- Soften cream cheese to room temperature: This helps you mix a smooth filling without lumps.
- Roll tight and chill: A tight roll and a short chill give neat slices and firm texture.
- Sharp knife, clean between cuts: Wipe the blade after each slice for clean rounds.
- Balance flavors with acid: Add a small amount of pickle, lemon, or mustard to cut through the fat.
- Avoid overfilling: Too much filling makes rolling hard and the slice fall apart.
- Try related low-carb roll recipes: If you like variations of roll-up snacks, try my take on keto crispy Reuben roll-ups for a different flavor and texture.
Variation
- Make it Spicy: Mix 1/2 teaspoon Sriracha or red pepper flakes into the filling. Add sliced pickled jalapeño before rolling.
- The Healthy Version: Use turkey salami or thin prosciutto, low-fat cream cheese, and add grated carrot or cucumber for crunch. Keep pickles low-sodium.
- The Deluxe Version: Add a strip of roasted red pepper, a sliver of sun-dried tomato, and a small sprig of arugula for peppery bite. Use smoked mozzarella for a deeper flavor.
- Vegetarian version: Use thin slices of smoked tofu or large roasted eggplant strips in place of salami and use a vegan cream cheese for a plant-based roll.
- Mediterranean twist: Use feta instead of cheddar, add chopped olives and oregano, and finish with a light drizzle of olive oil.
FAQs
Q: Can I make these ahead of time?
A: Yes. Make and roll them, then cover and chill up to 3 days. Slice just before serving if you want the freshest look. For parties, make ahead the night before and arrange on the tray just before guests arrive.
Q: Why does my roll fall apart when I slice?
A: Usually too much filling or a loose roll causes this. Roll tightly, chill 20–30 minutes, and use a very sharp knife. Also avoid very watery fillings which will not set well.
Q: Can I freeze the roll-ups after they are rolled?
A: Yes. Wrap tightly in plastic and freeze up to one month. Thaw in the fridge overnight. Re-slice after thawing and warm briefly if you like them toasted.
Q: Can I use other meats?
A: Yes. Prosciutto, turkey salami, or thin roast beef work. Each meat changes the salt and texture, so taste the filling before you roll and adjust mustard or pickle to balance.
Q: My filling is oily after mixing. What went wrong?
A: This can happen if the cheese got too warm or shredded cheese is oily. Chill the mixture for 10–15 minutes, then stir again. Use full-fat cream cheese and not too much shredded cheese to avoid separation.
Q: How thin should I slice the finished roll?
A: Aim for 1/2 to 1 inch slices. Thicker slices hold a meatier bite; thinner slices work well as single-bite appetizers.
Q: Can I make this gluten-free?
A: Yes. The base recipe is naturally gluten-free, but check processed ingredients like mustard or pickles for hidden gluten.
Conclusion
For a quick, tasty low-carb snack that looks great and tastes even better, these Irresistible Keto Salami Roll-Ups deliver bold deli flavor with simple steps. If you want a similar classic roll idea with cream cheese, check this take on Erica’s Cornucopia Salami Rollups with Cream Cheese for more inspiration. For plant-based cooks interested in a spicy vegan salami option, see the recipe for Spicy Vegan Salami at This Healthy Kitchen to adapt flavors and textures.
Keto Salami Roll-Ups
Ingredients
Method
- In a bowl, beat softened cream cheese until smooth. Add shredded cheese, chopped pickle, Dijon, chives, and pepper. Mix until the filling is even and glossy.
- Lay out salami slices on a clean surface. Ensure they are smooth and flat, avoiding folds.
- Spread about 1-2 tablespoons of filling evenly on one end of the salami slice, leaving a 1/4 inch border.
- If desired, add thin strips of pickle or pepper for extra crunch over the filling.
- Starting from the filled end, roll the salami tightly to form a compact cylinder and seal the end.
- Place rolls seam-side down on a tray and chill for 20-30 minutes.
- Slice the chilled rolls into 1-inch rounds using a very sharp knife.
- Optionally, for crisp edges, place sliced rolls under a broiler for 1-2 minutes or air fry at 375°F for 3-4 minutes.