Irish Soda Bread
What Makes Irish Soda Bread Special
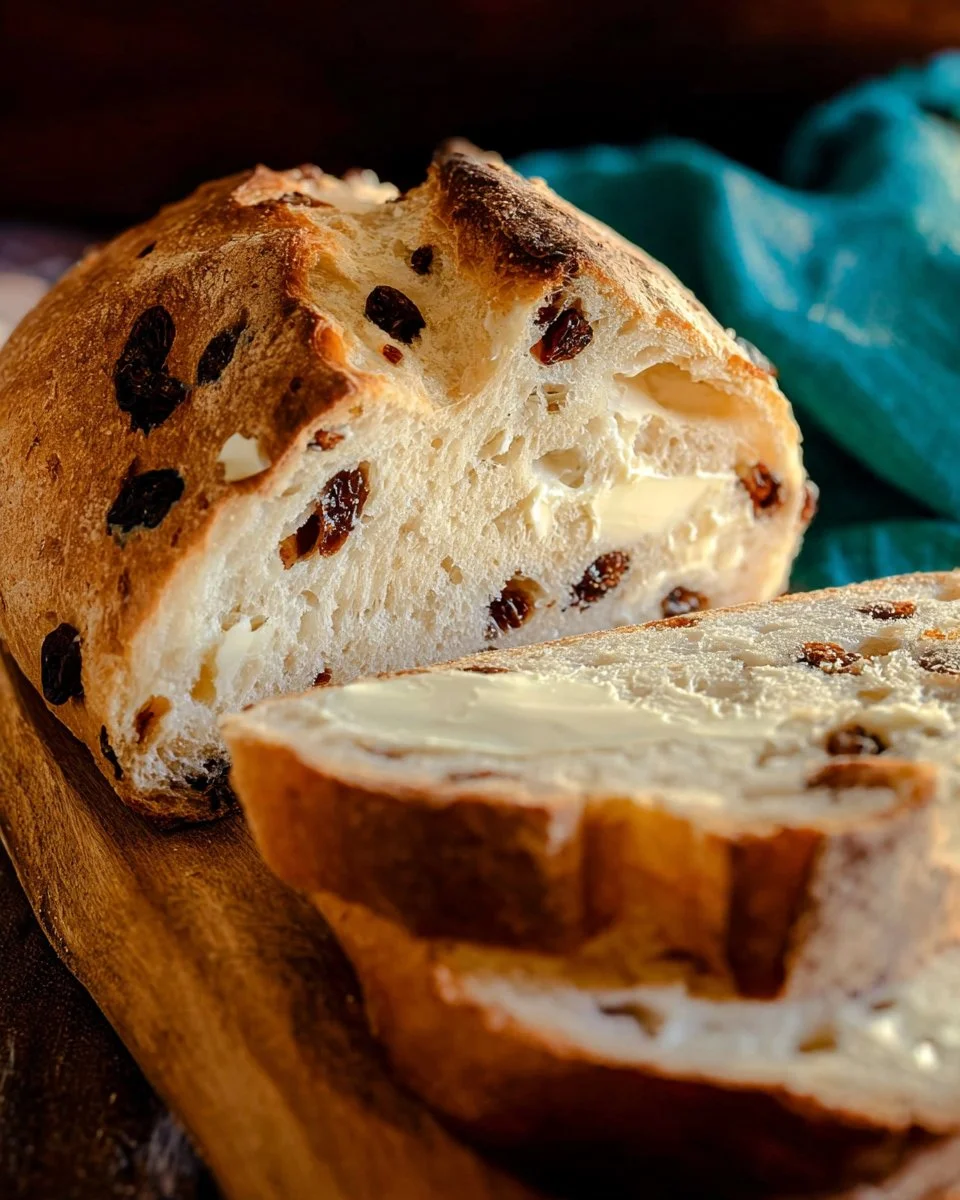
Irish Soda Bread is a humble loaf with big character. This easy Irish Soda Bread smells of warm buttered crust and simple, wholesome grain. It uses baking soda instead of yeast, so it rises fast. You get a golden crust and a tender, slightly dense crumb. People love its rustic look, comforting aroma, and the way a single cross on top opens the loaf while baking.
This homemade Irish Soda Bread traces back to rural Ireland, where bakers used pantry staples and fresh buttermilk. It pairs well with soups, cheeses, or a hot cup of tea. The flavor is mild and slightly tangy from the buttermilk. The texture is soft inside with a crisp exterior. That contrast makes each slice satisfying.
If you want the best Irish Soda Bread recipe that stays true to tradition yet fits modern kitchens, this one delivers. It is a simple Irish Soda Bread recipe that anyone can master. In under an hour you can bake a loaf that fills the house with comfort and invites sharing. If you enjoy rustic breads, try this loaf with a hearty meal like a warm Carnitas Cornbread Casserole for a crowd-pleasing combo.
Why This Recipe is Perfect
- Quick and easy: Ready from bowl to table in about 1 hour.
- Pantry-friendly: Uses flour, baking soda, salt, and buttermilk.
- Budget-friendly: Affordable ingredients everyone keeps on hand.
- Beginner-friendly: No kneading expertise or fancy tools required.
- Family-approved: Mild flavor appeals to kids and adults alike.
- Reliable texture: Clear method for a crisp crust and tender crumb.
- Fast rise: Baking soda plus buttermilk gives immediate lift.
This version is better than many online because it explains the why behind each step. You will get consistent results. I focus on visual and sensory cues so you learn how to judge doneness and texture. Small tips—like scoring deeply and checking the loaf’s bottom sound—turn a good loaf into the best Irish Soda Bread you’ll bake.
How to Make Irish Soda Bread
This overview explains the logic. Baking soda reacts with buttermilk’s acidity to create gas bubbles. Those bubbles raise the dough right away, so you work fast. Minimal mixing keeps the crumb tender. Kneading lightly creates a cohesive loaf without activating gluten too much. Scoring the top helps heat reach the center and allows the loaf to expand without cracking awkwardly.
Start by whisking dry ingredients. Mix in buttermilk until a soft dough forms. Turn it out and knead briefly. Shape into a round, cut a deep cross, then bake at high heat. The high oven temperature gives immediate oven spring and a strong crust. Allow the loaf to cool to finish cooking inside and to let the crumb set.
Tips for perfect texture and appearance:
- Use cold buttermilk for better oven spring.
- Don’t overmix—stop when dough just comes together.
- Score deeply (about 1/2 inch) so the loaf opens evenly.
- Bake until the crust is deep golden and the loaf sounds hollow when tapped.
You can adapt the timing slightly for larger or smaller loaves. This method keeps the process simple while giving a dependable, delicious result.
Ingredients
- 4 cups all-purpose flour
- 1 teaspoon baking soda
- 1 teaspoon salt
- 1 3/4 cups buttermilk
Choose high-quality ingredients for the best loaf. Use fresh baking soda (check the date). Use unbleached all-purpose flour for cleaner flavor. For the buttermilk, full-fat gives richer flavor and better texture.
Substitutions:
- Dairy-free / vegan: Use plant-based buttermilk (soy or oat milk mixed with 1 tbsp lemon juice) and a vegan butter if you wish to brush the crust.
- Whole-grain: Replace up to half the flour with whole-wheat for nuttier flavor; expect a denser crumb.
- Low-sodium: Reduce salt to 1/2 teaspoon and add a saltier spread when serving.
For inspiration on shaping and presentation, see this festive pull-apart approach in the Cheesy Christmas Tree Bread post.
Step-by-Step Directions
-
Preheat the oven to 425°F (220°C).
- Visual cue: Oven at full heat and preheated baking sheet or cast-iron pan.
- Smell: You may detect the faint warm scent of the dry pan.
- Mistake to avoid: Don’t bake in a cold oven—this reduces oven spring.
-
In a large bowl, whisk together flour, baking soda, and salt.
- Visual cue: Evenly mixed pale powder with no lumps of soda.
- Sound: A light whisking sound as you aerate the flour.
- Mistake to avoid: Forgetting to dissolve lumps of baking soda leads to uneven rise.
-
Make a well in the center and pour in the buttermilk.
- Visual cue: A crater in the flour mound holding liquid.
- Smell: Slight tang from the buttermilk is fresh and pleasant.
- Mistake to avoid: Pouring too much at once can make the dough sticky—add gradually if needed.
-
Stir gently until a soft dough forms.
- Visual cue: Dough clumps coming together, slightly sticky but manageable.
- Touch: Dough should feel soft and slightly tacky, not wet.
- Mistake to avoid: Overmixing—stir just until combined.
-
Turn the dough onto a floured surface and knead lightly.
- Visual cue: Dough smoothing out and holding shape.
- Sound: Soft kneading, not loud or aggressive.
- Mistake to avoid: Heavy kneading makes the crumb tough; 6–8 light folds is enough.
-
Shape the dough into a round loaf and place it on a baking sheet.
- Visual cue: Smooth round with a seam tucked underneath.
- Plate tip: Use parchment to prevent sticking and ease transfer.
-
Cut a deep cross into the top of the loaf to help it rise.
- Visual cue: A clear cross about 1/2 inch deep.
- Smell: The raw dough scent intensifies slightly with exposed interior.
- Mistake to avoid: Shallow cuts can lead to uneven cracking.
-
Bake for 30–35 minutes or until golden brown.
- Visual cue: Deep golden crust and slightly cracked top.
- Sound: Tap the bottom—if it sounds hollow, it’s done.
- Mistake to avoid: Removing too early leaves the center doughy.
-
Allow to cool before slicing.
- Visual cue: Steam fades and crumb firms up.
- Mistake to avoid: Slicing hot leads to gummy texture; wait at least 20 minutes.
For shaping tricks and pull-apart techniques, this method pairs well with ideas from the Chicken Alfredo Monkey Bread approach.
How to Serve Irish Soda Bread
- Classic butter and jam: Slice thick, spread salted butter and your favorite jam. Simple and perfect.
- With soup or stew: Serve alongside beef stew or creamy potato soup to soak up rich broth.
- Cheese platter: Pair slices with sharp cheddar, smoked salmon, or soft goat cheese.
- Brunch plate: Toast slices, add a poached egg, sautéed greens, and a sprinkle of paprika. 🍞🧈
Plating tip: Serve on a wooden board with a butter dish and jam pot for a rustic feel. Warm slices lightly in the oven before serving for a fresh-baked experience.
Storage and Reheating
Fridge storage:
- Cool completely, wrap in foil or an airtight container.
- Keeps 2–3 days in the fridge. Chilling can toughen the crust; reheat to restore crispness.
Freezer storage:
- Wrap slices or whole loaf tightly in plastic, then foil.
- Freeze up to 3 months.
- Thaw at room temperature or overnight in the fridge.
Best reheating practice:
- Preheat oven to 350°F (175°C).
- Wrap loaf in foil and heat 10–15 minutes for a whole loaf. For slices, a quick 5–7 minutes will do.
- For a crisp crust, remove foil for the last 3 minutes.
- Avoid microwaving long-term—it makes the bread rubbery.
Pro Tips
- Test your baking soda: Mix 1/2 tsp with a little vinegar; it should fizz briskly.
- Use cold buttermilk for better control of the dough and stronger oven spring.
- Score deeply: A 1/2-inch cross keeps the loaf from bursting unpredictably.
- Don’t overwork the dough—this keeps the crumb tender.
- For a shinier crust, brush with melted butter right after baking.
- Add seeds (caraway or sesame) to the crust for texture and flavor.
- If you want a softer crust, cover the loaf with foil for the last 10 minutes of baking.
Variations
- Spicy version: Add 1 tsp caraway seeds and 1/2 tsp cracked black pepper for warmth.
- Healthy version: Replace 1 cup flour with rolled oats and add 1/2 cup mashed banana or applesauce for moisture.
- Vegan option: Use plant-based buttermilk and omit butter. Consider adding a tablespoon of olive oil for richness.
- Deluxe/gourmet: Fold in 1/2 cup raisins and 2 tbsp honey for a sweeter, tear-and-share loaf.
Each variation keeps the simple base but gives a new flavor profile. Adjust baking time slightly if you add wet ingredients.
Frequently Asked Questions (FAQ)
How can I prep ahead?
You can mix dry ingredients the night before and store them in a sealed container. Add buttermilk and bake the next day. For full prep, shape the loaf, cover tightly, and refrigerate up to 12 hours; bring to room temperature before baking.
Why did my loaf sink in the middle?
Common causes: too much liquid, overmixing, or underbaking. Ensure correct flour measure and stop mixing once the dough comes together. Bake until the bottom sounds hollow.
Can I use self-rising flour?
No—self-rising flour already contains leavening and salt, which will alter balance. Stick to all-purpose flour and add baking soda and salt as listed.
How do I adjust cooking time for a larger loaf?
Add 5–10 minutes for each extra 1/2 cup of flour added. Check for a deep golden crust and hollow sound when tapped.
What if my bread is too dry?
You may have added too much flour. Next time, reduce flour by 1/4 cup or add a tablespoon more buttermilk. When mixing, stop as soon as the dough holds together.
Is Irish Soda Bread healthy?
It is simple and can be made healthier by using whole-grain flour or adding seeds. It is not overly rich, and portion control keeps it balanced.
Can I add mix-ins like cheese or herbs?
Yes. Fold in up to 3/4 cup of grated cheese, herbs, or dried fruit after combining the dough. Keep mix-ins evenly distributed to avoid heavy spots.
Final Thoughts
This simple Irish Soda Bread recipe gives you a warm, rustic loaf with minimal fuss. It’s quick, reliable, and perfect for weeknight dinners or weekend baking. Save and share this easy Irish Soda Bread guide with friends who love cozy baking. Try variations, add flavors, and enjoy the comfort of homemade bread.
Conclusion
For more classic takes and variations, check out this beloved version of Grandma’s Irish Soda Bread – Sally’s Baking Addiction and this straightforward approach at Super Simple Irish Soda Bread | Alexandra’s Kitchen.
Irish Soda Bread
Ingredients
Method
- Preheat the oven to 425°F (220°C).
- In a large bowl, whisk together flour, baking soda, and salt until there are no lumps.
- Make a well in the center and pour in the buttermilk.
- Stir gently until a soft dough forms, being careful not to overmix.
- Turn the dough onto a floured surface and knead lightly until smooth.
- Shape the dough into a round and place it on a baking sheet lined with parchment paper.
- Cut a deep cross into the top of the loaf to help it rise.
- Bake for 30–35 minutes or until the crust is golden brown and sounds hollow when tapped.
- Allow to cool for at least 20 minutes before slicing to firm up the crumb.