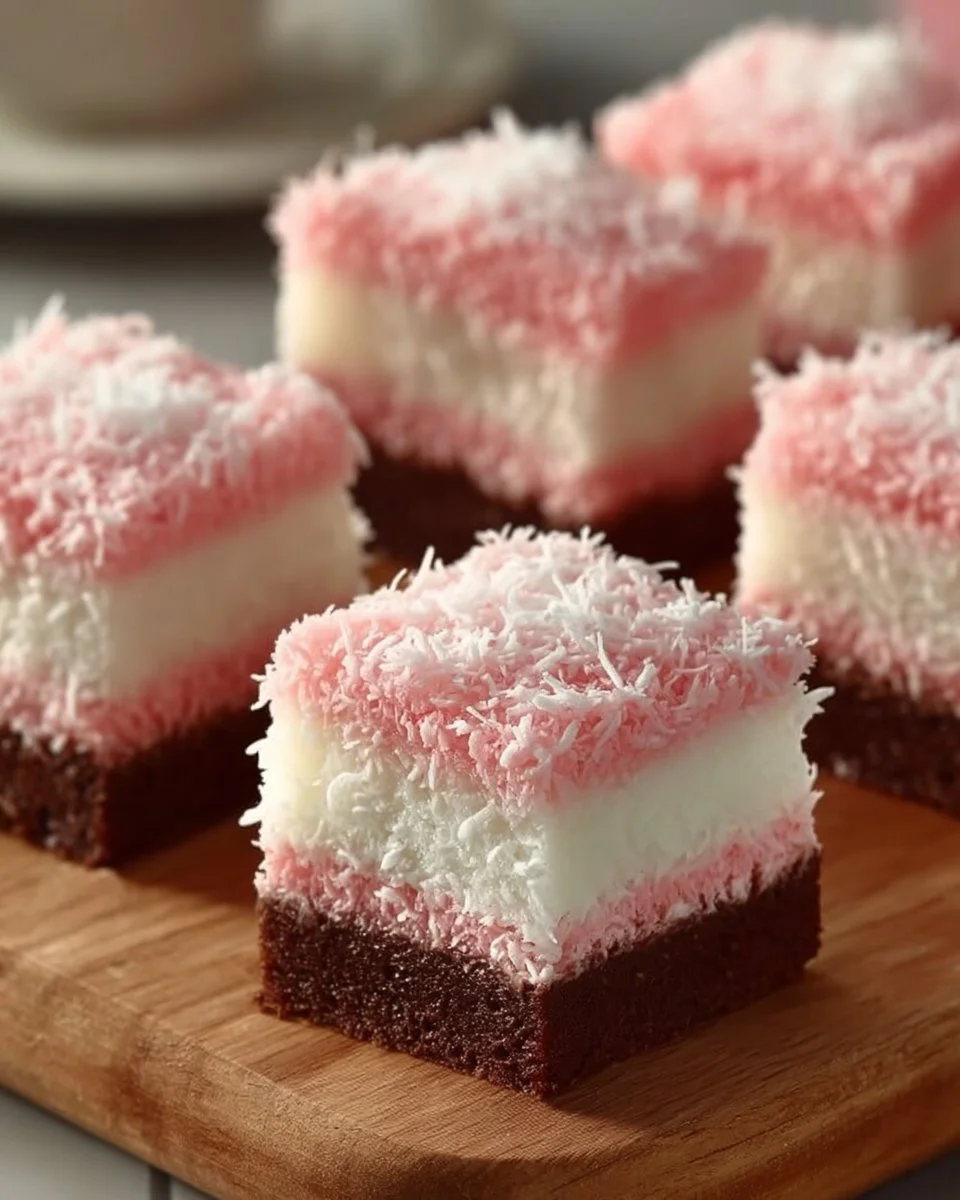
Pink Coconut Snowball Cake Bars are a cheerful, soft dessert that mixes coconut, sweet cream, and a pink candy shell. This treat likely grew from old-fashioned snowball cookies and classic coconut cakes. People loved snowball sweets for holiday tables because they are bright, light, and full of sweet coconut flavor. Over time, bakers shaped the idea into bars that are easy to cut and share. The pink color gives the bars a fun look for parties, showers, and weeknight treats.
When you open a pan, you will smell warm coconut and a light butter scent. The first bite feels soft like a cake, but you also get chewy coconut bits. The candy shell gives a thin crunch and a little sweet snap. The inside is moist, tender, and slightly dense like a good bar. The sugar and coconut make each bite rich but never heavy. You will want a cup of tea or cold milk beside it.
Many home cooks love this bar because it looks special but is easy to make. If you enjoy sweet, coconut desserts, these bars will please guests and children. If you like other easy bars, see this caramel apple cheesecake bars recipe for another simple tray bake idea. These Pink Coconut Snowball Cake Bars are a classic favorite because they bring color, coconut flavor, and soft cake texture together in a simple, friendly bake.
Why make this recipe
- Easy to make: The steps use simple mixing methods. No special tools or skills are needed.
- Time-saving: The batter comes together fast and bakes in one pan. You save time on shaping or cooling many small cookies.
- Crowd-pleaser: Bright pink color and coconut taste attract kids and adults at parties.
- Pantry-friendly: Most ingredients are common staples like flour, sugar, eggs, butter, and shredded coconut.
- Beginner-friendly: The method is forgiving. Minor changes in time or temperature still give good bars.
- Cost-effective: Basic ingredients keep cost low compared to store desserts.
- Versatile: You can change flavors or toppings easily to match seasons or events.
This version is better because it balances moist cake texture with coconut chew. The thin candy shell adds a visual pop and a little crunch without being hard. We keep the ratio of butter and flour simple so the bars stay soft and do not dry out.
How to make BEST RECIPE for Pink Coconut Snowball Cake Bars Download – Etsy
The main process is simple: make a soft cake batter, fold in shredded coconut, bake in a pan, cool, and top with a thin pink candy glaze and extra coconut. The logic is to create a tender crumb and keep moisture so the coconut stays soft and pleasant.
First, we cream butter and sugar. Creaming traps small air pockets that help the bars rise and make a tender texture. Next, we add eggs and vanilla. Eggs bind the batter and add structure; they also help the bars hold shape when sliced. Flour and baking powder set the crumb. We add a small amount of milk to loosen the batter so it spreads easily.
Folding in shredded coconut gently is key. Stirring too much can knock out the air and make the bars dense. The coconut gives chew and flavor, and its fat helps keep the bars moist.
Baking at a moderate temperature lets the bars set evenly. If the oven is too hot, the top browns too fast and the inside stays undercooked. If too slow, the bars dry out.
Cool fully before glazing. A warm bar will melt the glaze and make it run. The glaze is thin candy coating or a powdered sugar mix with a little cream and coloring. The goal is a thin shell that sets firm but not hard. Finish with extra shredded coconut to give the snowball look.
Ingredients
- 1 cup (225 g) unsalted butter, softened
- 1 1/2 cups (300 g) granulated sugar
- 2 large eggs, room temperature
- 2 teaspoons vanilla extract
- 2 1/2 cups (315 g) all-purpose flour
- 2 teaspoons baking powder
- 1/2 teaspoon fine salt
- 1/2 cup (120 ml) milk or coconut milk
- 2 cups sweetened shredded coconut, divided
- Pink candy coating or white chocolate melts colored pink (8–10 oz / 225–285 g)
- 1 cup powdered sugar (optional, for alternative glaze)
- 1–2 tablespoons heavy cream (optional, for powdered sugar glaze)
- Pink gel food coloring (if using powdered sugar glaze)
How to choose the best ingredients and substitutions:
- Butter: Use real unsalted butter for the best flavor. If you only have salted, reduce added salt slightly. For dairy-free, use a high-quality vegan butter.
- Shredded coconut: Choose sweetened shredded coconut for best moisture and flavor. For a lighter texture, try unsweetened but add 1–2 tablespoons extra sugar. For nut-free diets, coconut is safe for most people; for those avoiding coconut, try chopped oats or finely chopped puffed rice as a replacement.
- Pink candy coating: Use colored candy melts for an even shell. If you want to avoid food dyes, use white chocolate and a small amount of natural beet powder or skip coloring and make a plain coconut glaze.
- Flour: All-purpose works best. For a gluten-free version, try a 1:1 gluten-free flour blend and add 1/4 teaspoon xanthan gum if your blend lacks it.
Common substitutions:
- Milk: Use non-dairy milk like almond or oat to make bars dairy-light.
- Eggs: For an egg-free version, use commercial egg replacer or 1/4 cup applesauce per egg, but expect slightly different texture.
- Candy coating: Replace with a simple powdered sugar glaze made from powdered sugar and cream or milk.
Directions
-
Preheat and prepare the pan.
- Preheat oven to 350°F (175°C). Grease a 9×13 inch pan and line with parchment so bars lift easily.
- Visual cue: The pan should look evenly greased and paper should sit flat with overhang for lifting.
-
Cream butter and sugar.
- In a large bowl, beat softened butter and sugar until light and pale, 2–3 minutes.
- Visual cue: The mixture will turn a lighter yellow and fluff up slightly. It should look smooth and slightly glossy.
-
Add eggs and vanilla.
- Beat in eggs, one at a time, then add vanilla. Scrape bowl so mixture is even.
- Visual cue: The batter should look smooth without streaks of egg white. It will be slightly looser.
-
Mix dry ingredients.
- In another bowl, whisk flour, baking powder, and salt.
- Visual cue: The dry mix is even and has no clumps; flour looks evenly pale.
-
Combine dry and wet.
- Add half the dry mix to the wet batter, mix briefly, add milk, then the rest of the dry mix. Mix until just combined.
- Visual cue: Batter will be thick but pourable. Avoid overmixing — no streaks of flour should remain, but a few small lumps are fine.
-
Fold in shredded coconut.
- Stir in 1 1/2 cups shredded coconut by hand, folding gently.
- Visual cue: Coconut threads should be evenly distributed, and batter should hold some texture.
-
Spread batter and bake.
- Spread batter evenly into prepared pan. Smooth top lightly.
- Bake 25–30 minutes until top is golden and a toothpick in center comes out with a few moist crumbs.
- Visual cue: Edges will pull slightly from pan, top will show a light golden color. The center should be set and not wet.
-
Cool completely.
- Let the pan cool on a rack for at least 1 hour. Cooling firms the crumb for clean slices.
- Visual cue: Bars will steady and stop giving when touched.
-
Prepare pink glaze.
- Melt candy coating or chocolate and add a few drops of gel color if needed. If using powdered sugar glaze, mix powdered sugar with heavy cream to a thick but pourable consistency and tint pink.
- Visual cue: The glaze should be smooth, glossy, and run slowly off a spoon.
-
Glaze and top.
- Pour glaze over cooled bars and spread thinly. Sprinkle remaining 1/2 cup shredded coconut on top while glaze is wet.
- Visual cue: Glaze should set to a thin shell within 20–30 minutes at room temperature. Coconut will stick well.
-
Slice and serve.
- After glaze sets, lift the parchment and cut into bars with a sharp knife. Wipe knife between cuts for clean edges.
- Visual cue: Bars should have neat edges, a soft yet firm crumb, and a glossy pink top with coconut flakes.
How to serve BEST RECIPE for Pink Coconut Snowball Cake Bars Download – Etsy
- Party tray: Arrange bars on a white plate and sprinkle a few extra coconut threads and edible glitter for color. Use a doily under the bars to make them look bakery-style.
- Dessert plate: Serve one bar with a scoop of vanilla ice cream and a drizzle of toasted coconut syrup. The cold ice cream contrasts with the soft bar.
- Tea time: Cut small squares and serve with strong black tea or lightly sweetened iced tea. The coconut and pink color look pretty beside a teacup.
- Brunch or baby shower: Pair with fresh berries and whipped cream. For a matching dessert board, include the bars with mini muffins and fruit.
For more tray-bake style ideas to serve with your bars, try this best blueberry yogurt recipe which pairs well for a balanced sweet and tangy menu.
How to store BEST RECIPE for Pink Coconut Snowball Cake Bars Download – Etsy
Short-term (fridge):
- Store in an airtight container for up to 4 days.
- Place a sheet of parchment between layers to avoid sticking.
- If glaze is soft, chill for 20–30 minutes before stacking.
Long-term (freezer):
- Freeze uncut or cut bars in a single layer on a baking sheet until firm, about 1 hour.
- Wrap each bar tightly in plastic wrap and place in a freezer bag or container for up to 3 months.
- Thaw in the fridge overnight.
Best way to reheat:
- For a warm bar, unwrap and place on a baking sheet. Heat in a 300°F (150°C) oven for 8–10 minutes or until warmed through. This keeps moisture and avoids drying.
- Do not microwave for long times; a quick 10–12 second zap can be used, but the glaze may melt and get soggy.
- If glaze becomes soft, chill briefly after warming to set the shell again.
Tips to make BEST RECIPE for Pink Coconut Snowball Cake Bars Download – Etsy
- Use room-temperature eggs and butter for smooth batter and even rise.
- Measure flour by spooning into the cup and leveling off to avoid dense bars.
- Do not overmix after adding flour; stop when dry streaks disappear.
- Toast half of the shredded coconut lightly in a pan for 3–4 minutes for added nutty flavor.
- Let bars cool fully before glazing so glaze sets cleanly.
- If candy melts are too thick, add a small piece of vegetable shortening, one teaspoon at a time, to thin.
- For clean slices, warm the knife under hot water, dry it, and then cut each slice with a single straight stroke.
Variation
- The Deluxe Version: Add 1/2 cup finely chopped macadamia nuts into the batter and sprinkle toasted coconut on top for crunch and richness.
- The Healthy Version: Use unsweetened shredded coconut, replace half the sugar with coconut sugar, and use almond flour in a 1:1 blend with all-purpose flour. Expect a denser but still tasty bar.
- The Tropical Version: Fold in 1/2 cup diced dried pineapple or mango and use coconut milk in the batter for a stronger island flavor.
- The Chocolate Version: Swirl melted dark chocolate into batter before baking or drizzle dark chocolate over the pink glaze for contrast.
- The Lemon-Coconut Version: Add 1 tablespoon lemon zest to batter and a tiny lemon juice to the glaze for a bright, tangy note.
FAQs
Q: Can I make these bars ahead of time?
A: Yes. They store well in the fridge for up to 4 days and freeze for up to 3 months. Wrap bars tightly to keep them fresh.
Q: Why did my bars turn out dry?
A: Dry bars often mean too much flour or overbaking. Measure flour correctly and bake until the center has a few moist crumbs, not completely dry.
Q: Why is my glaze cracking or not setting?
A: If glaze is too thick, it can crack when it sets. If it is too thin, it may not set. Use candy melts or the right powdered sugar ratio. Avoid cooling bars in a very cold place until glaze firms.
Q: My shredded coconut burned when toasting. What went wrong?
A: Coconut burns quickly. Toast it on medium-low and stir constantly. Remove when it turns light golden and smells nutty.
Q: Can I make mini snowball bars instead of one pan?
A: Yes. Change to a muffin tin or mini pan. Reduce baking time and watch for set centers. Mini bars will bake faster, often 12–18 minutes.
Q: Can I use fresh coconut instead of shredded?
A: Fresh coconut can work but has higher moisture. Pat it dry and reduce milk a little to keep batter from being too wet.
Q: My bars are sticky after glazing. How to fix?
A: Let the glaze set at room temperature or chill briefly to firm the shell. If humidity is high, glaze may stay tacky; chill in the fridge for 10–15 minutes.
Conclusion
These Pink Coconut Snowball Cake Bars are a simple way to bring color and coconut flavor to any table. For a pretty way to display your bars, consider a special serving piece like a snowball serving plate on Etsy. If you want a small, sweet recipe idea to serve alongside, try a quick no-bake sweet like the three-ingredient date fudge recipe for a simple pairing.