
Why You’ll Love This Cheeseburger Pockets Recipe
If you’re looking for a fun and flavorful weeknight meal that your family will adore, this cheeseburger pockets recipe is for you! These pockets are perfect for busy evenings when you want something comforting yet quick to prepare. You can savor the classic taste of a cheeseburger in a convenient, hand-held package, making it a great solution for dinner or lunch. You may also find Best Recipe Mini Big Mac Cheeseburgers useful.
Ingredients
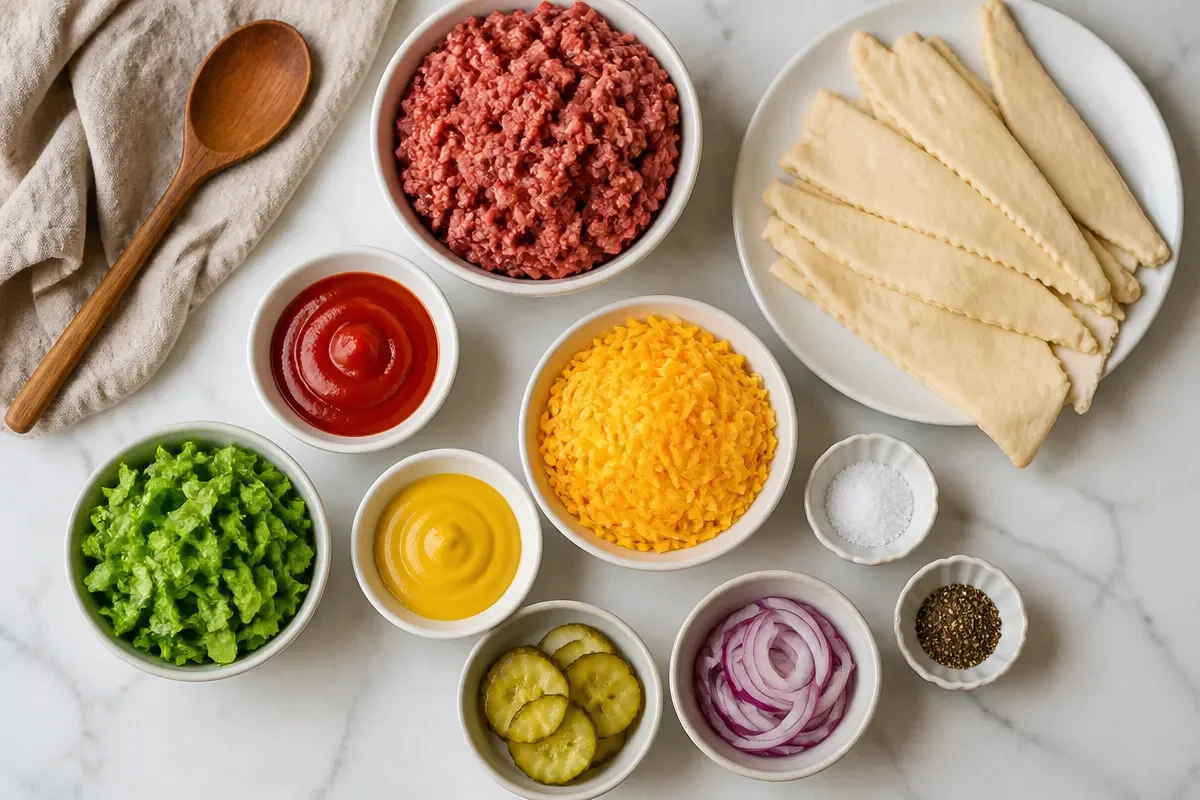
You may also find Bourbon Bbq Bacon Cheeseburger Meatballs useful.
- 1 package crescent roll dough
- 1 lb ground beef
- 1/4 cup ketchup
- 1/4 cup mustard
- 1 cup shredded cheddar cheese
- Salt and pepper to taste
- Optional toppings (lettuce, pickles, onions, etc.)
Using quality ingredients can elevate this dish significantly. Opt for fresh ground beef and sharp cheddar cheese for the best flavor. For dietary needs, consider using a dairy-free cheese alternative or gluten-free crescent roll dough, which you can find at most grocery stores. You may also find Cheeseburger Macaroni Soup useful.
Step-by-Step Directions
-
Preheat the Oven: Start by preheating your oven according to the instructions on the crescent roll package. This ensures the dough will rise properly and get that perfect golden-brown color.
-
Cook the Beef: In a skillet over medium heat, brown the ground beef until it’s no longer pink. You’ll know it’s ready when it starts to smell savory and delicious. Be careful not to overcook it, as it can turn tough.
-
Add Flavor: After draining any excess fat, stir in the ketchup, mustard, salt, and pepper. Mix until everything is combined, and enjoy the mouthwatering aroma that fills your kitchen.
-
Prepare the Dough: Unroll the crescent roll dough and separate the triangles. Lay them out flat, making sure they are ready to be filled.
-
Fill the Pockets: Spoon a generous portion of the beef mixture onto the wide end of each triangle. Then, top with cheese and any additional toppings of your choice. Remember not to overfill, or they may burst while baking!
-
Roll and Bake: Carefully roll up the dough around the filling, starting from the wide end. Place each pocket seam-side down on a baking sheet. Bake them according to the package instructions until they are golden brown and flaky.
-
Serve and Enjoy: Once out of the oven, let them cool slightly before serving. These pockets are best enjoyed warm, allowing the melted cheese to give that extra comfort.
Why This Recipe Works
- Quick and Easy: These cheeseburger pockets can be made in under 30 minutes, making them a perfect choice for busy weeknights.
- Crowd-Pleaser: With the classic cheeseburger flavors, this recipe is sure to please both kids and adults.
- Pantry-Friendly: The ingredients are straightforward and commonly found in your pantry, ensuring you can whip them up with little notice.
This version stands out because it takes the beloved flavors of cheeseburgers and turns them into a fun, portable meal that everyone can enjoy, with a crispy exterior that’s hard to resist.
Serving Suggestions
-
Dipping Sauces: Serve with extra ketchup, mustard, or even a spicy sriracha mayo for dipping. The contrast in flavor adds excitement to each bite.
-
Fresh Salad: Pair your cheeseburger pockets with a light side salad topped with a tangy vinaigrette for a balanced meal.
-
Themed Parties: These pockets are great for casual gatherings or game nights. Serve them with fries on the side for a complete comfort-food experience.
Storage and Reheating
Store any leftover cheeseburger pockets in an airtight container in the fridge for up to 3 days. To keep them crispy, reheat in the oven at 350°F for about 10 minutes. You can also freeze them for up to a month. For quick lunches, simply thaw in the fridge overnight before reheating.
Pro Tips
- Flavor Boost: Add a bit of Worcestershire sauce to the beef mixture for an extra depth of flavor.
- Texture Tip: For a crisper crust, brush the tops with an egg wash before baking.
- Common Mistake: Many people overfill their pockets, causing them to burst. Stick to a tablespoon of filling per pocket for the best results.
- Ingredient Upgrade: Consider using ground turkey or chicken for a leaner option.
- Time-Saver: Pre-cook and season the beef mixture ahead of time, so you can assemble the pockets quickly.
Variations
Spicy Version
Add diced jalapeños or a splash of hot sauce to the beef mixture. This adds a delightful kick for those who love heat!
Lighter and Healthier Version
Swap out crescent roll dough for low-carb tortillas and use lean ground turkey instead of beef for a lighter twist without sacrificing flavor.
Vegetarian or Vegan Version
Replace the ground beef with lentils or a meat substitute like crumbled tofu and use vegan cheese to keep it plant-based.
FAQ
Q: How long can I make cheeseburger pockets ahead of time?
A: You can prepare the filling a day in advance and store it in the fridge. Assemble and bake when you’re ready to serve.
Q: What should I do if my cheeseburger pockets turn out soggy?
A: Ensure that you drain all excess fat from the beef properly, and avoid overfilling the dough to maintain the best texture.
Q: Can I use a different kind of cheese?
A: Absolutely! Swiss or pepper jack cheese can also work wonderfully, depending on your flavor preference.
Q: What’s the best way to freeze leftover pockets?
A: Allow them to cool completely before placing them in a freezer-safe bag. They should keep well for up to a month.
Q: How can I make a larger batch?
A: Simply double the ingredients and use multiple baking sheets to accommodate all the pockets.
Q: Do I need to bake them immediately after assembling?
A: While it’s best to bake them right away, you can also refrigerate assembled pockets for a few hours before baking.
Conclusion
In just a short time, you can create these tasty cheeseburger pockets that are sure to impress everyone at your table. They’re simple to prepare and make a fantastic meal for any occasion. For more creative variations, try the Cheeseburger Pockets Recipe or an easy keto alternative with Keto Cheeseburger Pockets. Enjoy cooking!

Cheeseburger Pockets
Ingredients
Method
- Preheat your oven according to the instructions on the crescent roll package.
- In a skillet over medium heat, brown the ground beef until it’s no longer pink.
- After draining any excess fat, stir in the ketchup, mustard, salt, and pepper.
- Unroll the crescent roll dough and separate the triangles.
- Spoon a generous portion of the beef mixture onto the wide end of each triangle.
- Top with cheese and any additional toppings.
- Roll up the dough around the filling, starting from the wide end, and place each pocket seam-side down on a baking sheet.
- Bake them according to the package instructions until golden brown and flaky.
- Let them cool slightly before serving warm.