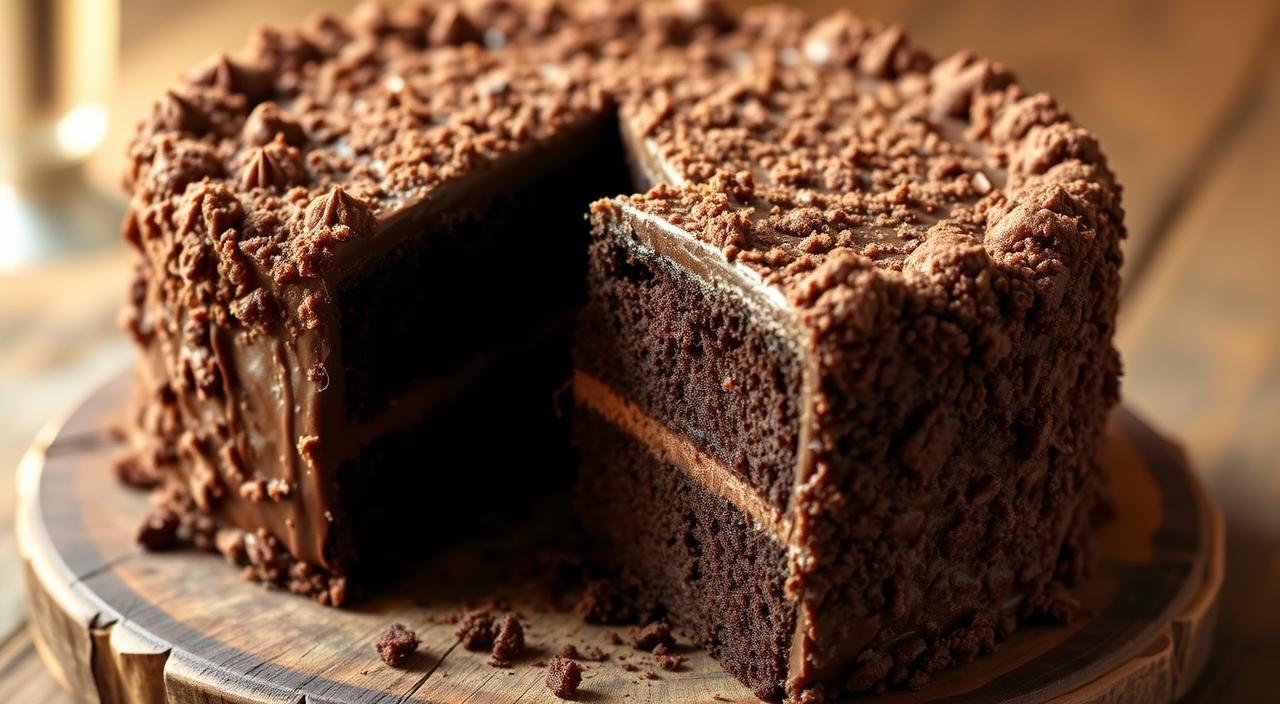
Ever craved a dessert so chocolatey it meets your sweet tooth’s demands? The Brooklyn Blackout Cake might be what you need. This chocolate icon has won hearts for years with its moist, dark chocolate layers.
This treat’s unique charm comes from its layers of velvety chocolate cake and rich chocolate pudding. It’s topped with chocolate crumbs. The mix of smooth filling and crunchy outside is a treat for your senses.
First made in Brooklyn during World War II, the famous Brooklyn Blackout Cake has lasted through time. We’ll show you how to make this masterpiece at home. You’ll get detailed steps, expert tips, and creative twists to perfect this chocolate delight.
Even if you’re new to baking big desserts, we’ve got you covered. Our easy-to-follow guide makes this impressive cake doable for anyone. With a little patience and our help, you’ll be enjoying this chocolate dream in no time!
Key Takeaways
- The Brooklyn Blackout Cake features three elements: chocolate cake layers, pudding filling, and crumb coating
- This iconic dessert originated during World War II in Brooklyn, New York
- The cake’s name references the blackout drills conducted during wartime
- You can make this chocolate masterpiece at home with our detailed instructions
- The recipe can be broken down into manageable steps for bakers of all experience levels
- Proper cooling between steps is essential for the cake’s structural integrity
The Rich History of Brooklyn Blackout Cake
The Brooklyn Blackout Cake has a rich history that combines local bakery innovation with World War II. This chocolate dessert has won the hearts of many in New York and beyond. It’s not just a treat, but also a story of American creativity during a critical time.
Origins at Ebinger’s Bakery
Ebinger’s Bakery in Brooklyn created the authentic Brooklyn Blackout Cake. It was a beloved spot from 1898 until it closed in 1972. George Ebinger, a German immigrant, founded it, making it a key part of Brooklyn’s food scene.
Ebinger’s was known for its high-quality treats. Their Brooklyn Blackout Cake was made with a secret recipe that stayed hidden for years. It quickly became a favorite, attracting people from all over.
When Ebinger’s closed, many thought the recipe was lost. People still remember waiting in long lines for this chocolate cake. Though the bakery is gone, its cake lives on in new versions and memories.
Why It’s Called “Blackout” Cake
The “Blackout” name comes from World War II. Brooklyn Navy Yard was a key target, leading to blackout drills. These drills made buildings dark, like the cake.
The cake’s dark chocolate and crumbs reminded people of these drills. It’s also said that the cake’s intense chocolate is so rich, it’s like a “blackout” for your taste buds. It’s a chocolate explosion that takes over your senses.
| Feature | Original Ebinger’s Version | Modern Interpretations | Historical Significance |
|---|---|---|---|
| Recipe Status | Closely guarded secret | Various recreations | Lost when bakery closed |
| Chocolate Intensity | Legendary richness | Often intensified further | Reflected wartime “blackout” |
| Cultural Impact | Brooklyn institution | National recognition | Symbol of WWII era Brooklyn |
| Availability | Ebinger’s locations only | Specialty bakeries nationwide | Created sense of local pride |
Why the Brooklyn Blackout Cake Remains an Iconic Dessert
Even though Ebinger’s Bakery closed years ago, the famous Brooklyn Blackout Cake is still loved. It’s more than a cake; it’s a piece of history that inspires and delights people everywhere.
Cultural Significance
The Brooklyn Blackout Cake is a symbol of New York’s food history. It keeps the memory of Ebinger’s alive, even though the bakery is gone.
It’s featured in many cookbooks, magazines, and TV shows. Chefs and bakeries everywhere make their own versions, keeping the tradition alive.
For many, the cake is a nostalgic reminder of New York. Even those who never tried Ebinger’s version still seek it out. They’re drawn by its legendary status and family stories.
What Makes It Special Among Chocolate Desserts
The delicious Brooklyn Blackout Cake is unique. It has a pudding-like filling that makes it incredibly moist. This is different from regular layer cakes with buttercream frosting.
The cake’s chocolate crumb coating adds drama and texture. These crumbs, made from the cake, mix with the creamy pudding and cake layers for a special experience.
The cake’s chocolate flavor is intense. It uses chocolate in the cake, pudding, and crumb coating. This triple-chocolate mix gives it a rich, complex taste that chocolate lovers adore.
This mix of elements makes the cake unforgettable. It’s a must-try for anyone who loves great chocolate desserts.
Essential Ingredients for the Perfect Brooklyn Blackout Cake
To make the legendary Brooklyn Blackout Cake at home, you need a special set of ingredients. These ingredients give the cake its deep flavor and richness. Let’s explore what you need to make this chocolate masterpiece in your kitchen.
Cake Components
The base of any Brooklyn Blackout Cake is top-notch chocolate. Use Dutch-processed cocoa powder for its deep color and mellow taste. This makes the cake almost black, giving it its name.
All-purpose flour adds structure, while a mix of white and brown sugars balances sweetness and moisture. Brown sugar’s molasses adds depth that pairs well with chocolate.
Eggs bind the cake layers together, providing structure and stability. Butter adds richness, and buttermilk makes the cake tender. Baking soda and baking powder ensure the cake rises right.
Salt enhances the chocolate flavor, and vanilla extract adds aromatic complexity. For the best results, try Valrhona or Guittard cocoas in your homemade Brooklyn Blackout Cake.
If you like other chocolate treats, check out our chocolate brownies recipe. It uses similar high-quality ingredients.
Chocolate Pudding Filling Ingredients
The pudding filling makes this cake stand out. You’ll need unsweetened and semi-sweet chocolate for a balanced flavor. This mix is rich but not too sweet.
Cornstarch thickens the pudding to the perfect consistency. Whole milk and heavy cream add richness and body. Egg yolks are key for a silky texture and to bind the pudding.
A little sugar balances the chocolate’s bitterness, and salt enhances the flavor. Vanilla extract rounds out the chocolate notes with its warm aroma.
While some ingredients can be swapped, others are essential. Egg yolks and cornstarch give the pudding its unique texture. Using low-quality chocolate will affect the taste, so choose the best you can afford.
Equipment You’ll Need
Before we start making Brooklyn Blackout Cake, let’s get the right tools. You don’t need fancy equipment to make this chocolate dessert at home. The right tools will help you get that perfect taste and texture.
Baking Tools
To make an easy Brooklyn Blackout Cake, you’ll need these basics:
- Three 8-inch round cake pans (or two 9-inch pans with recipe adjustments)
- Parchment paper for lining pans to prevent sticking
- Mixing bowls in various sizes for separate components
- Measuring cups and spoons for precise ingredient portions
- A whisk for combining dry ingredients thoroughly
- An electric mixer (stand or hand-held) for proper batter consistency
- A rubber spatula for folding ingredients and scraping bowls
- A medium saucepan for cooking the chocolate pudding
- A wire cooling rack to prevent soggy cake bottoms
These tools help your cake layers bake evenly and your pudding get just right. Most people already have these in their kitchen.
Optional but Helpful Equipment
While not necessary, these items can make your homemade Brooklyn Blackout Cake even better:
- Kitchen scale for precise measurements, especially for flour and cocoa
- Offset spatula for spreading pudding and crumbs with professional precision
- Serrated knife for leveling cake layers and creating even surfaces
- Cake turntable for easier assembly and decorating
- Sifter for cocoa powder to prevent lumps
- Food processor for creating fine, uniform cake crumbs
Even without these special items, you can still make a great cake. Use a regular knife, a spoon instead of an offset spatula, and crush cake scraps by hand. This classic dessert is easy to make, no matter your kitchen setup.
Preparing Your Brooklyn Blackout Cake: Step-by-Step
To make the best Brooklyn Blackout Cake recipe, focus on detail and technique. We’ll guide you through each step. This process might seem hard, but we’ve made it easy to follow for perfect chocolate cake.
Making the Chocolate Cake Layers
Start by preparing your cake pans. Grease them well and line with parchment paper. This step helps remove the cakes without breaking.
For an authentic Brooklyn Blackout Cake, mix dry and wet ingredients separately. In one bowl, whisk flour, cocoa, baking soda, baking powder, and salt. In another, mix sugar, eggs, oil, and vanilla.
Slowly add the dry mix to the wet ingredients, alternating with buttermilk. This method gives the cake its famous texture. Always scrape down the bowl to mix well.
Mixing the Batter Properly
Mixing the batter right is key for a tender cake. Use a gentle folding motion after adding flour. Avoid vigorous mixing to prevent a tough cake.
Stop mixing when the ingredients just come together. A few lumps are okay. The batter should be smooth and glossy but not too bubbly.
Baking Times and Temperatures
Preheat your oven to 350°F (175°C). Place the rack in the center. Pour the batter into prepared pans and smooth the tops.
Bake for 25-30 minutes, checking at 22 minutes. The cakes are done when a toothpick comes out with a few moist crumbs. Don’t open the oven door too soon to prevent sinking.
Creating the Rich Chocolate Pudding
The pudding is what makes a Brooklyn Blackout Cake special. Start by mixing sugar, cornstarch, cocoa, and salt in a saucepan. Whisk in milk slowly to avoid lumps.
Cook over medium heat, stirring constantly, until it thickens. Then, cook for 2 more minutes. Remove from heat and stir in chopped chocolate until melted.
Temper the egg yolks to prevent scrambling. Whisk a bit of hot pudding into the yolks, then add it back to the saucepan. Cook for 2 minutes more until thick and glossy.
Achieving the Perfect Consistency
The pudding should coat a spoon and hold a line when you run your finger through it. This means it’s thick enough. If it’s lumpy, strain it through a fine-mesh sieve for smoothness.
Whisk in butter and vanilla off the heat. The butter makes the pudding richer and sets it perfectly. Keep whisking until smooth and glossy.
Cooling and Setting the Pudding
Put the pudding in a bowl and press plastic wrap directly on it. This prevents a skin from forming. Direct contact is essential.
Let it cool at room temperature for 30 minutes, then refrigerate for at least 2 hours, preferably 4. The pudding must be chilled and set before using it.
Preparing the Chocolate Crumb Coating
The crumb coating is a key part of an authentic Brooklyn Blackout Cake. Use one cake layer for crumbs. Break it into pieces and spread them on a baking sheet.
Dry the cake pieces in a 250°F (120°C) oven for 15 minutes. They should be dry but not burnt. Cool them, then process into fine crumbs like coarse sand.
Sift the crumbs through a coarse sieve to remove big pieces. This step ensures your cake has a classic, velvety exterior.
Assembling Your Brooklyn Blackout Cake
Now it’s time to put all your hard work together. Assembling your Brooklyn Blackout Cake into its iconic layered form is the exciting part. This stage turns individual parts into a stunning dessert that will wow everyone.
With patience and our step-by-step guide, you’ll make a cake that looks as good as it tastes.
Layering the Cake
First, make sure your cake layers are completely cool. Use a long serrated knife to level the tops. This makes sure your cake stacks evenly and doesn’t lean.
Put your serving plate or cake board on a turntable if you have one. Place four strips of parchment paper in a square on the plate, extending beyond the edges. These strips will catch any drips and keep your plate clean.

Choose the flattest cake layer for the base and place it bottom-side down on the parchment strips. This gives your cake a stable base. Handle each layer carefully because these chocolate cakes are moist and delicate.
If your layers are too fragile, freeze them briefly. This makes them firmer and easier to handle while building your cake.
Applying the Pudding Filling
Your chocolate pudding filling should be cooled but still spreadable, like thick frosting. If it’s too firm, whisk it a bit to loosen it. If it’s too runny, refrigerate it for 15-20 minutes before you start.
Use an offset spatula to spread about 1 cup of pudding on the center of your bottom layer. Spread it out evenly, leaving a ½ inch border around the edges. Make a thicker ring of pudding around the edges to prevent the filling from spilling out when you add the next layer.
Place your second cake layer on top, pressing down gently to secure it. Make sure it’s centered and level before adding more pudding. If it slides, use three or four wooden skewers to hold it in place temporarily.
| Assembly Challenge | Quick Solution | Prevention Tip |
|---|---|---|
| Sliding layers | Insert wooden skewers as temporary supports | Chill cake between adding layers |
| Pudding oozing out | Create a thicker pudding dam around edges | Use slightly less filling per layer |
| Cracking layers | Press gently when placing layers | Ensure layers are completely cooled |
| Uneven appearance | Use offset spatula to smooth sides | Level cake layers before assembly |
For a three-layer cake, repeat the process with your final layer, placing it bottom-side up. This ensures the top is flat. If your pudding is too soft or your cake leans, refrigerate it for 15-20 minutes to firm up before continuing.
Once all layers are stacked, remove the parchment strips by pulling them straight out. Use your offset spatula to smooth any pudding that may have escaped. Your delicious Brooklyn Blackout Cake is now ready for its signature crumb coating!
Mastering the Signature Crumb Coating
Creating an authentic Brooklyn Blackout Cake means mastering the crumb coating. This coating is what makes the cake stand out. It contrasts beautifully with the smooth inside, making it a feast for the eyes and taste buds.
Creating the Perfect Crumbs
To make a stunning classic Brooklyn Blackout Cake, focus on the crumbs. Start by setting aside one cake layer for crumbs. Let it cool down completely before you begin.
You can make crumbs in two ways. For a rustic look, break the cake into pieces by hand. For a finer texture, pulse it in a food processor until it’s like pea-sized crumbs.
The crumbs should be about the size of coffee grounds. Spread them on a baking sheet and dry them for 30 minutes. This step helps them stick well without getting soggy.
The crumb coating isn’t just decoration – it’s the signature element that transforms a chocolate cake into a true Brooklyn classic. Those textured crumbs are what customers at Ebinger’s Bakery would recognize immediately.
Techniques for Even Application
Before adding crumbs, coat your cake with a thin layer of pudding. This acts as glue. It should be just enough to hold the crumbs but not too much.
Here are three methods to apply crumbs evenly:
| Method | Technique | Best For | Difficulty Level |
|---|---|---|---|
| Press Method | Gently press handfuls of crumbs against sides | Beginners | Easy |
| Toss Method | Carefully toss crumbs at sides while rotating cake | Even coverage | Medium |
| Roll Method | Roll top surface in shallow pan of crumbs | Top decoration | Medium |
Work over a baking sheet to catch falling crumbs. Use a bench scraper for a clean edge. If spots are bare, add pudding and more crumbs.
The crumb coating should be thick. It’s not just a dusting but a rich layer that makes the cake special.
Pro Tips for a Successful Brooklyn Blackout Cake
Creating the perfect Brooklyn Blackout Cake requires professional baking secrets. These tips turn simple ingredients into a delicious dessert. They help you make this iconic cake with confidence.
Ingredient Temperature Considerations
Temperature is key for a great Brooklyn Blackout Cake. Eggs and butter at room temperature are essential. They help the cake layers stay tender and even.
Cold ingredients are important too. Use cold milk for the pudding filling. This prevents lumps and makes the texture smooth.
When melting chocolate, aim for 110-115°F. This ensures the best flavor and structure. If ingredients are cold, warm eggs in warm water and cut butter into small cubes.
Make-Ahead Strategies
Breaking down the recipe into parts makes it easier. Here’s a timeline for special occasions:
| Component | Can Be Made Ahead | Storage Method | Maximum Time |
|---|---|---|---|
| Cake Layers | Yes | Wrapped in plastic, refrigerated | 2 days |
| Pudding Filling | Yes | Covered with plastic touching surface | 24 hours |
| Cake Crumbs | Yes | Airtight container at room temp | 3 days |
| Assembled Cake | Partially | Refrigerated, loosely covered | 4-6 hours |
The assembled cake needs 2 hours to set in the fridge. But don’t make it more than 6 hours ahead. Assemble it the day you plan to serve for the best taste.
Achieving the Right Texture
The perfect Brooklyn Blackout Cake has the right balance of moisture and structure. Use a scale to measure flour for better results. This avoids dry cake.
Stop mixing the batter as soon as it’s just combined. Overmixing makes the cake tough. Aim for a smooth, pourable batter.
The pudding filling should be like thick custard. It should coat the back of a spoon and leave a clear path when you draw your finger through. The crumb coating should be moist but not too wet.
Check cake doneness with a toothpick. It should have a few moist crumbs. This ensures the cake is just right.
Troubleshooting Common Brooklyn Blackout Cake Issues
When making your Brooklyn Blackout Cake, you might face some common problems. But don’t worry, our guide will help you solve them easily. Even experienced bakers run into these issues. So, don’t get discouraged if your first try isn’t perfect.
With these tips, you’ll be able to fix any problems. You’ll make a delicious Brooklyn Blackout Cake that looks and tastes amazing.
Fixing Runny Pudding
A pudding that’s too thin won’t hold your cake layers right. This can make your cake slide apart. Runny pudding usually comes from not cooking it enough, using too much cornstarch, or adding too much liquid.
To fix runny pudding, try these rescue methods:
- Put the pudding back on the stove and whisk in a cornstarch slurry (1 tablespoon cornstarch mixed with 2 tablespoons cold water)
- Cook the pudding until it thickly coats the back of a spoon and leaves a clear path when you run your finger through it
- Let it cool properly—pudding thickens a lot as it cools
In a pinch, adding 2-3 ounces of melted chocolate can thicken your pudding and add flavor. The pudding should be firm enough to hold the cake layers together without squishing out the sides.

Preventing Dry Cake Layers
Dry cake is a big disappointment, especially with a Brooklyn Blackout Cake. To get moist, tender layers, focus on a few key things:
First, check for doneness by inserting a toothpick into the center. It should come out with a few moist crumbs, not wet batter. Baking for just one minute too long can dry out your cake.
Measuring flour correctly is crucial—use the spoon and level method instead of scooping. Store your cake layers tightly wrapped in plastic wrap while still warm to keep moisture in.
“If your cake layers are already dry, brush them with simple syrup before assembly. This baker’s secret weapon can revive even the driest cake layers.”
Solving Crumb Coating Problems
The crumb coating is key to a Brooklyn Blackout Cake’s look. But it can be tricky. If your crumbs aren’t sticking, your pudding layer might not be tacky enough.
To fix uneven crumbs, try this professional technique: place your crumbs in a wide, shallow dish. Gently roll the sides of the frosted cake in them, then press crumbs onto the top surface with your hand.
Crumbs that are too big will fall off; too small, and they’ll lose texture. Aim for a mix of small pea-sized crumbs and finer particles. For bare spots, dab a little pudding and press crumbs into place.
With these tips, you’ll be ready to tackle any Brooklyn Blackout Cake challenges. Remember, practice makes perfect. Even if your cake isn’t perfect, it will still be delicious!
Delicious Variations of Brooklyn Blackout Cake
Beyond the classic version lies a world of Brooklyn Blackout Cake variations. These keep the dessert’s decadent spirit alive while introducing new flavors and meeting dietary needs. The beauty of this iconic chocolate creation is its adaptability—it welcomes creative twists while still honoring its rich heritage.
Whether you’re looking to surprise guests with an unexpected flavor combination or need to adapt the recipe for specific dietary requirements, these variations prove that this beloved dessert can evolve without losing its soul.
Modern Twists on the Classic Recipe
For coffee enthusiasts, an espresso-infused Brooklyn Blackout Cake adds a sophisticated dimension to the classic chocolate profile. Simply add 2-3 tablespoons of espresso powder to your cake batter and incorporate a hint of coffee into the pudding filling for a mocha-inspired treat that enhances the chocolate’s natural depth.
Fruit and chocolate make a timeless pairing, and adding a thin layer of raspberry preserves between cake layers creates a delicious Brooklyn Blackout Cake with bright, tangy notes that cut through the richness. The slight acidity of the berries brings the chocolate flavors into sharper focus.
Texture enthusiasts might appreciate folding chocolate chips into the batter or adding a layer of chocolate ganache for an extra dimension of richness. For a refreshing twist, a mint-chocolate version made with peppermint extract transforms the cake into a cool, sophisticated dessert perfect for holiday gatherings.
Presentation variations can also make your creation stand out. Try crafting individual mini blackout cakes in ramekins for elegant dinner parties, or deconstruct the elements into a stunning trifle layered in a clear glass bowl. These approaches might just lead to your own version of the best Brooklyn Blackout Cake recipe your family has ever tasted.
Dietary Adaptations
Creating a gluten-free Brooklyn Blackout Cake is entirely possible with the right flour blend. We recommend using a mix of rice flour, tapioca starch, and xanthan gum, or a high-quality cup-for-cup gluten-free flour blend. You may need to increase moisture slightly, as gluten-free flours tend to absorb more liquid—add an extra egg or a few tablespoons of applesauce to maintain the cake’s signature moistness.
Vegan bakers can rejoice too! Replace eggs with flax eggs (1 tablespoon ground flaxseed mixed with 3 tablespoons water per egg) or aquafaba. Substitute dairy milk with almond, oat, or coconut milk, and use coconut oil or vegan butter instead of conventional butter. For the pudding filling, coconut cream creates a luscious texture that rivals the original.
“The true test of a great recipe is how well it can be adapted while maintaining its essence. A Brooklyn Blackout Cake that can be made gluten-free or vegan without sacrificing flavor is truly a masterpiece of baking engineering.”
For those watching sugar intake, reduce granulated sugar by up to one-third and supplement with monk fruit sweetener or stevia. Just remember that sugar contributes to the cake’s structure, so you may need to adjust other ingredients slightly to maintain the perfect texture that makes a delicious Brooklyn Blackout Cake so irresistible.
Conclusion
The Brooklyn Blackout Cake is more than a dessert. It’s a piece of American baking history you can make at home. It started at Ebinger’s Bakery and became famous across the country. This chocolate masterpiece still charms dessert fans today.
We’ve shown you how to make this iconic cake. From mixing the chocolate batter to preparing the silky pudding filling. And don’t forget the signature crumb coating. The steps might seem complex, but they’re easy to follow.
This cake is special because of how its parts come together. The moist cake, rich pudding, and chocolate crumb create a unique dessert. The smooth filling and textured coating offer a chocolate experience like no other.
Don’t worry if your first Brooklyn Blackout Cake isn’t perfect. Every try gets you closer to mastering it. Once you get the hang of it, try different variations to make it your own.
Serving this impressive dessert to friends and family is more than sharing cake. It’s sharing a beloved Brooklyn tradition. Seeing their joy when they taste it makes all the effort worth it. Your Brooklyn Blackout Cake is a celebration and a skill to cherish.
FAQ
How long does it take to make a Brooklyn Blackout Cake from start to finish?
Making a Brooklyn Blackout Cake takes about 4-5 hours. This includes cooling and setting times. The actual preparation time is around 90 minutes.
We suggest making the cake layers and pudding on one day. Then, assemble the cake the next day for the best results.
Can I use regular cocoa powder instead of Dutch-processed?
Yes, you can use regular unsweetened cocoa powder as a substitute. However, the cake will taste slightly different and be lighter in color.
Dutch-processed cocoa gives the cake its deep, dark chocolate color. If using regular cocoa, add 1/8 teaspoon of baking soda for every 3 tablespoons of cocoa to balance the acidity.
How do I store leftover Brooklyn Blackout Cake?
Store leftover cake in an airtight container in the fridge for up to 4 days. The pudding filling also needs to be refrigerated.
For the best taste and texture, let slices come to room temperature for about 20 minutes before serving. Freezing the assembled cake is not recommended as the pudding texture can change upon thawing.
Why is my pudding not thickening properly?
If your pudding isn’t thickening, it could be due to several reasons. It might not have cooked long enough, you might have used the wrong amount of cornstarch, or there’s too much liquid.
Ensure the pudding thickens visibly and coats the back of a spoon. If it’s still too thin, recook it with more cornstarch mixed with cold water. Whisk constantly until it reaches the right consistency.
Can I make a Brooklyn Blackout Cake without a stand mixer?
Absolutely! You can make this cake without a stand mixer. A hand mixer or even whisking by hand works well.
When mixing by hand, cream the butter and sugar well. Also, mix the dry ingredients carefully without overmixing.
What’s the best chocolate to use for Brooklyn Blackout Cake?
For the best cake, use high-quality semi-sweet or bittersweet chocolate with 60-70% cocoa content for the pudding. Ghirardelli, Guittard, or Valrhona are great choices.
Avoid chocolate chips as they contain stabilizers that affect melting. For cocoa powder, use premium Dutch-processed varieties like Droste or Valrhona for that intense chocolate flavor and color.
Can I make mini Brooklyn Blackout Cakes instead of one large cake?
Yes! To make mini cakes, bake the batter in cupcake tins or small cake pans. Bake for about 15-20 minutes for cupcakes (test with a toothpick).
Once cooled, cut each cupcake horizontally, fill with pudding, and coat with crumbs. This makes adorable individual servings perfect for parties.
Why did my cake layers sink in the middle?
Sinking cake layers often result from underbaking, opening the oven door too early, or expired leavening agents. Make sure your baking powder and soda are fresh.
Preheat your oven well and avoid opening the oven door during the first 20 minutes of baking. Also, don’t overmix the batter, as this can cause it to collapse during baking.
Is Brooklyn Blackout Cake the same as Devil’s Food Cake?
No, Brooklyn Blackout Cake and Devil’s Food Cake are not the same. Brooklyn Blackout Cake has chocolate pudding between the layers and a crumb coating on the outside.
Devil’s Food Cake has a lighter texture, uses traditional frosting, and doesn’t have the pudding filling or crumb coating that Brooklyn Blackout Cake is known for.
How can I make my Brooklyn Blackout Cake dairy-free?
To make a dairy-free version, use plant-based butter (like Earth Balance) instead of regular butter. Use almond or oat milk instead of buttermilk (add 1 tablespoon vinegar to curdle it).
Replace whole milk and heavy cream in the pudding with full-fat coconut milk. Make sure your chocolate is dairy-free as well. These substitutions will keep the rich texture while accommodating dairy restrictions.